Send Data
HTTP Send Data
To send data, you must first add a device. Special read and write “API KEY” when the device is created Data processing is performed according to the access method (POST, GET, POST/GET) that is generated and determined.
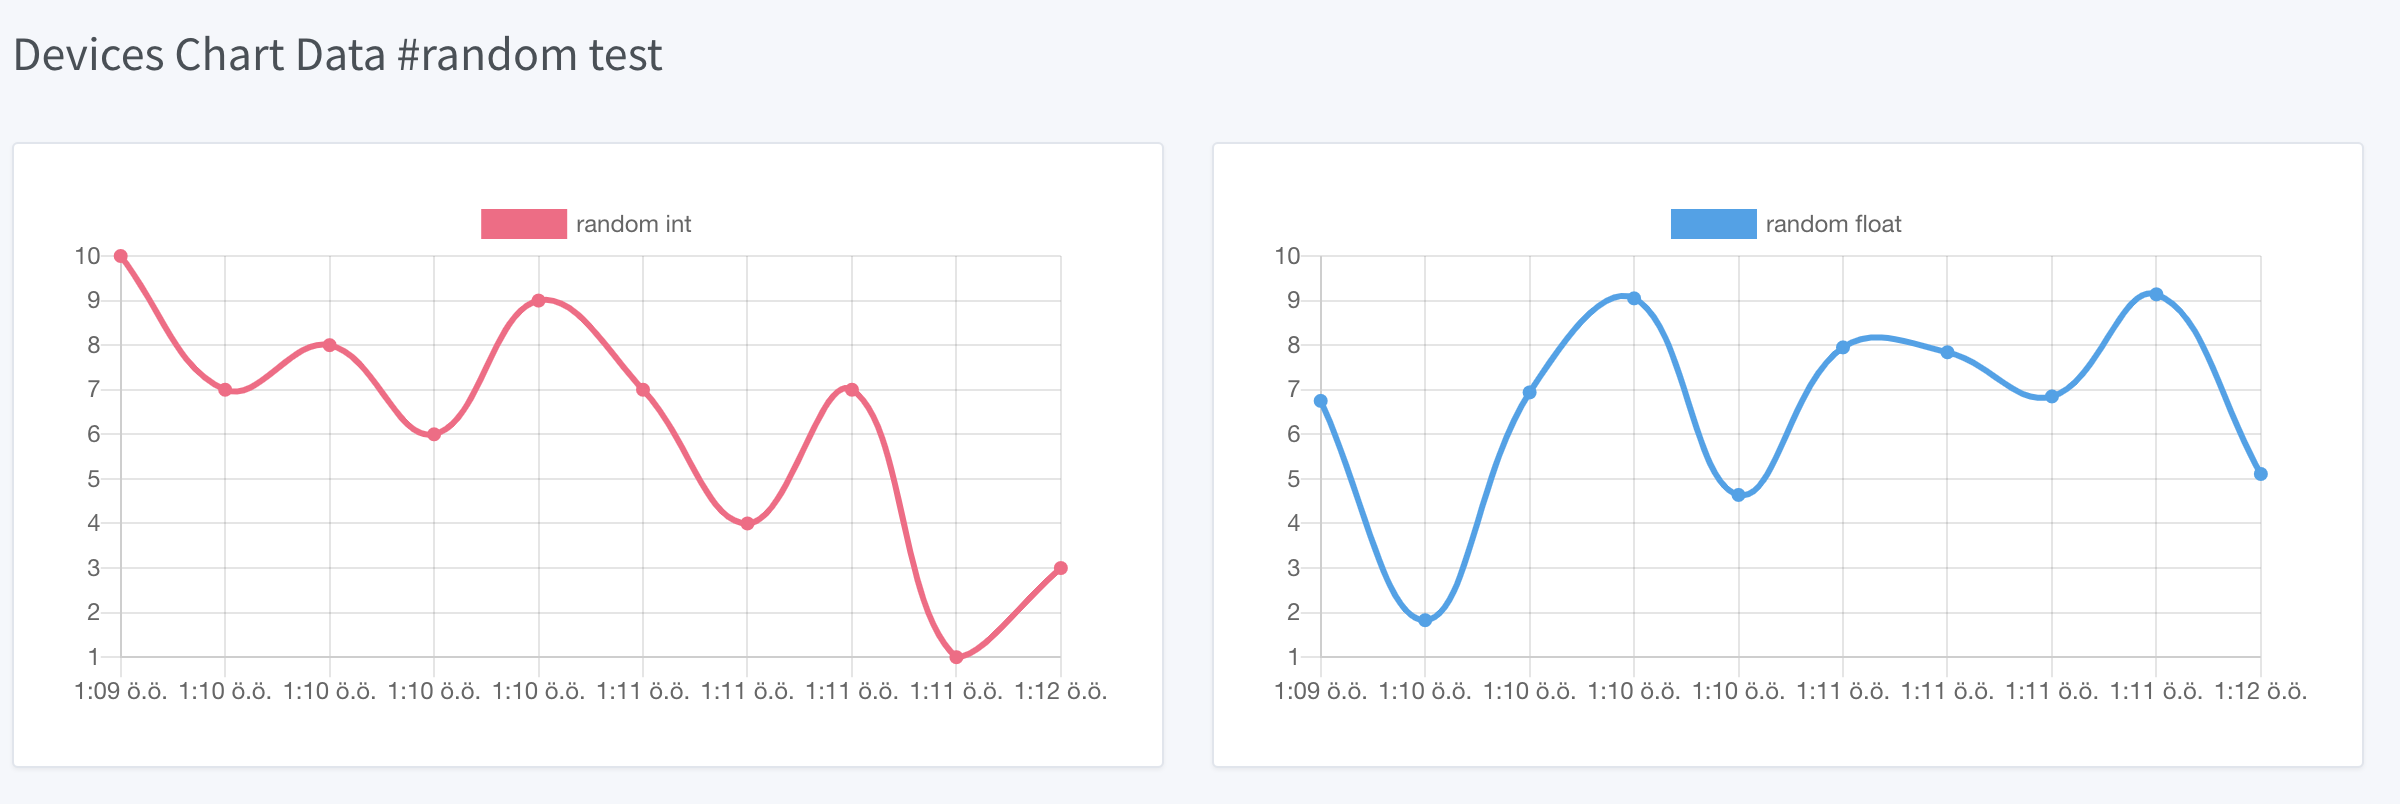
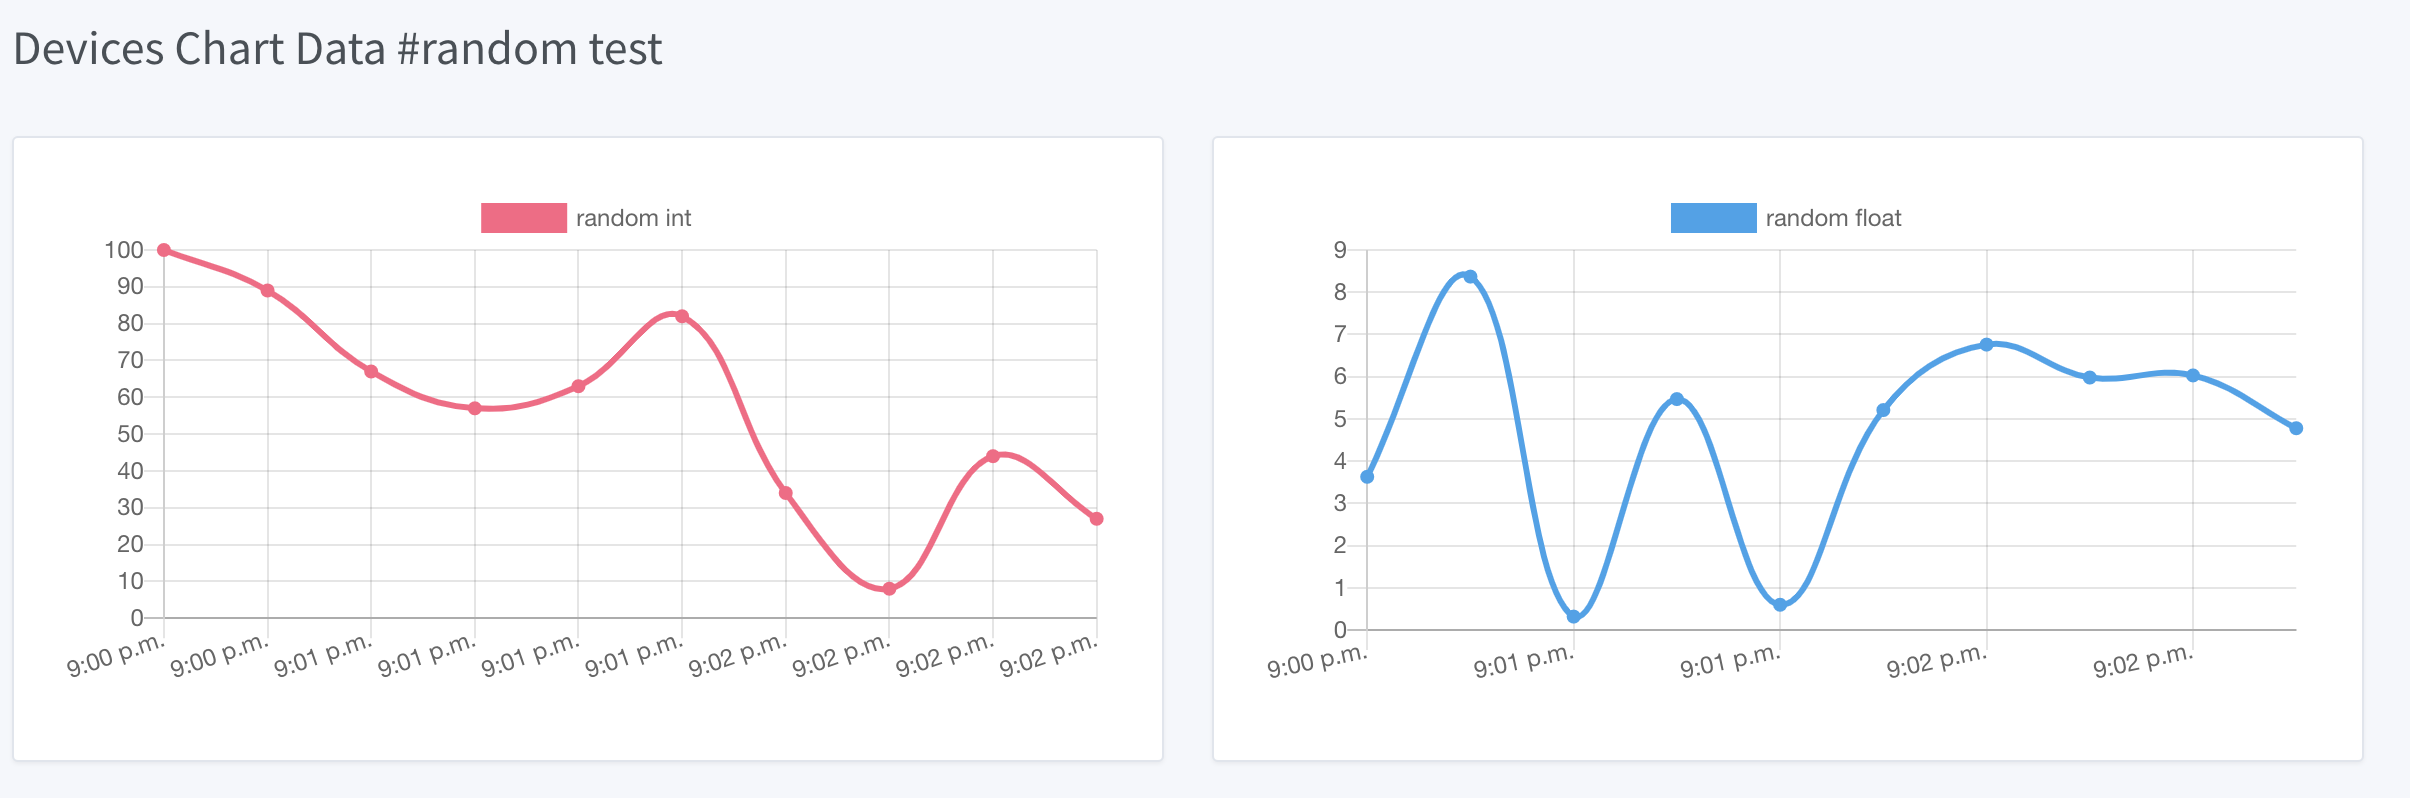
For example; Let our device be in a structure that receives humidity, heat and light values. For this example, the device named “#100 - Demo Data HTTP” was created on iothook.com. IoThook .
Let the IoT device read the data from the sensors and send this data to us once every 15 seconds, a total of 100 times.
You can access the read and write API Keys created for the #100 iot device from the IoThook dashboard.
The API ENDPOINT address we will use to send data to IoThook servers with Python is https://iothook.com/api/update/. Writing api_key information is needed to send data. You can access this KEY from the device settings page.
There are 2 required fields to send data. These fields are api_key and field_1 fields. APIKEY your device ownership field_1 absolutely must be because it validates and must have at least one data field. Other fields defined even if they are not sent, they are recorded as None.
Send JSON Data in POST with Python
In this example, JSON data is sent to the device channel named “#100 - Demo Data HTTP” using the HTTP POST method with Python. When the data is sent successfully, Json REST output of the data is received. You can do this with the response.json() method, we are doing.
Example output:
>>> {'device': 650, 'field_1': '6', 'field_2': '3.49', 'field_3': '22', 'field_4': None, 'field_5': None, 'field_6': None, 'field_7': None, 'field_8': None, 'id': 502491, 'pub_date': '2019-08-31T01:07:29.438160', 'remote_address': '88.242.135.167&python-requests/2.18.4&HTTP/1.1'}
Send JSON Data in POST with Python Examples:
You can find this example and others at IoT Examples Github.
"""
  Python ile IoThook REST Api Testi

  IoThook'da her cihazin bir kimlik numarasi APIKEY'i vardir.
  Bu APIKEY kullanilarak veriler IoThook'a POST metodu ile gonderilir.
  5 kere 15 saniyede bir random verileri iothook'a gonderir.

  Bu ornek IotHook servisine veri almak/gondermek icin baslangic seviyesinde
  testlerin yapilmasini amaclamaktadir.

  v1 : 11 Eylul 2017
  v2 : 19 Agustos 2019
  v3 : 31 Ekim 2022

  Sahin MERSIN - electrocoder

  Daha fazlasi icin

  http://www.iothook.com
  https://www.mesebilisim.com
  https://mesemekatronik.com
  https://electrocoder.blogspot.com
  https://github.com/meseiot/iotexamples

  sitelerine gidiniz.

  Yayin : http://mesebilisim.com

  Licensed under the Apache License, Version 2.0 (the "License").
  You may not use this file except in compliance with the License.
  A copy of the License is located at

  http://www.apache.org/licenses/
"""

import json
import pprint
import random
import time

import requests

headers = {'Content-type': 'application/json'}

# demo account API_KEY
# https://iothook.com/en/device/data/100/
# 100 - Demo Data HTTP
API_KEY = '9e722c4fc6c834b15ba01e86'  # write api key
url = 'http://iothook.com/api/update/'

for i in range(5):
    data = {  # write api key
        'api_key': API_KEY,  # demo hesap #100 - Demo Data HTTP
        'field_1': random.randint(1, 10),
        'field_2': round(random.uniform(0.0, 10.0), 2),
    }

    data_json = json.dumps(data)

    response = requests.post(url, data=data_json, headers=headers)
    pprint.pprint(response.json())
    time.sleep(15)
Send JSON Data in POST with Python Examples 2:
You can find this example and others at IoT Examples Json Post 1 Github.
"""
  Python ile IoThook REST Api Testi

  IoThook'da her cihazin bir kimlik numarasi APIKEY'i vardir.
  Bu APIKEY kullanilarak veriler IoThook'a POST metodu ile gonderilir.
  100 kere 15 saniyede bir random verileri iothook'a gonderir.

  Bu ornek IotHook servisine veri almak/gondermek icin baslangic seviyesinde
  testlerin yapilmasini amaclamaktadir.

  v1 : 11 Eylul 2017
  v2 : 19 Agustos 2019
  v3 : 31 Ekim 2022

  Sahin MERSIN - electrocoder

  Daha fazlasi icin

  http://www.iothook.com
  https://www.mesebilisim.com
  https://mesemekatronik.com
  https://electrocoder.blogspot.com
  https://github.com/meseiot/iotexamples

  sitelerine gidiniz.

  Yayin : http://mesebilisim.com

  Licensed under the Apache License, Version 2.0 (the "License").
  You may not use this file except in compliance with the License.
  A copy of the License is located at

  http://www.apache.org/licenses/
"""

import json
import pprint
import random
import time

import requests

headers = {'Content-type': 'application/json'}

# demo account API_KEY
# https://iothook.com/en/device/data/100/
# 100 - Demo Data HTTP
API_KEY = '9e722c4fc6c834b15ba01e86'  # write api key
url = 'http://iothook.com/api/update/'

for i in range(100):
    data = {  # write api key
        'api_key': API_KEY,  # demo hesap #100 - Demo Data HTTP
        'field_1': random.randint(1, 10),
        'field_2': round(random.uniform(0.0, 10.0), 2),
    }

    data_json = json.dumps(data)

    response = requests.post(url, data=data_json, headers=headers)
    pprint.pprint(response.json())
    time.sleep(15)
Send JSON Data in POST with Python Examples 3:
You can find this example and others at IoT Examples Json Update 2 Github.
"""
  Python ile IoThook REST Api Testi

  IoThook'da her cihazin bir kimlik numarasi APIKEY'i vardir.
  Bu APIKEY kullanilarak veriler IoThook'a POST metodu ile gonderilir.
  1000 kere 15 saniyede bir random verileri iothook'a gonderir.

  Bu ornek IotHook servisine veri almak/gondermek icin baslangic seviyesinde
  testlerin yapilmasini amaclamaktadir.

  v1 : 11 Eylul 2017
  v2 : 19 Agustos 2019
  v3 : 31 Ekim 2022

  Sahin MERSIN - electrocoder

  Daha fazlasi icin

  http://www.iothook.com
  https://www.mesebilisim.com
  https://mesemekatronik.com
  https://electrocoder.blogspot.com
  https://github.com/meseiot/iotexamples

  sitelerine gidiniz.

  Yayin : http://mesebilisim.com

  Licensed under the Apache License, Version 2.0 (the "License").
  You may not use this file except in compliance with the License.
  A copy of the License is located at

  http://www.apache.org/licenses/
"""

import json
import pprint
import random
import time

import requests

headers = {'Content-type': 'application/json'}

# demo account API_KEY
# https://iothook.com/en/device/data/100/
# 100 - Demo Data HTTP
API_KEY = '9e722c4fc6c834b15ba01e86'  # write api key
url = 'http://iothook.com/api/update/'

for i in range(1000):
    data = {  # write api key
        'api_key': API_KEY,  # demo hesap #100 - Demo Data HTTP
        'field_1': random.randint(0, 100),
        'field_2': random.randint(0, 100),
        'field_3': random.randint(0, 100),
        'field_4': random.randint(0, 100),
        'field_5': random.randint(0, 100),
        'field_6': random.randint(0, 100),
        'field_7': random.randint(0, 100),
        'field_8': random.randint(0, 100),
    }

    data_json = json.dumps(data)

    response = requests.post(url, data=data_json, headers=headers)
    pprint.pprint(response.json())
    time.sleep(15)
Send Data in GET with Python
With the IoThook Api v6 update, it allows sending data with the GET method.
To send data, you must first add a device. Special read and write “API KEY” when the device is created Data processing is performed according to the access method (POST, GET, POST/GET) that is generated and determined.
For example; Let our device be in a structure that receives humidity, heat and light values. For this example, the device named “#100 - Demo Data HTTP” was created on iothook.com. IoThook .
Let the IoT device read the data from the sensors and send this data to us once every 15 seconds, a total of 100 times.
You can access the read and write API Keys created for the #100 iot device from the IoThook dashboard.
The API ENDPOINT address we will use to send data to IoThook servers with Python is https://iothook.com/api/update/. Writing api_key information is needed to send data. You can access this KEY from the device settings page.
There are 2 required fields to send data. These fields are api_key and field_1 fields. APIKEY your device ownership field_1 absolutely must be because it validates and must have at least one data field. Other fields defined even if they are not sent, they are recorded as None.
Send Data in GET with Python Examples:
You can find this example and others at IoT Examples Get Write Github.
"""
  Python ile IoThook REST Api Ornegi

  IoThook'da her cihazin bir kimlik numarasi APIKEY'i vardir.
  Bu APIKEY kullanilarak veriler IoThook'a GET metodu ile gonderilir.

  Bu ornek IoThook servisine veri almak/gondermek icin baslangic seviyesinde
  testlerin yapilmasini amaclamaktadir.

  v1 : 20 Eylul 2017
  v2 : 19 Agustos 2019
  v3 : 31 Ekim 2022

  Sahin MERSIN - electrocoder

  Daha fazlasi icin

  http://www.iothook.com
  https://www.mesebilisim.com
  https://mesemekatronik.com
  https://electrocoder.blogspot.com
  https://github.com/meseiot/iotexamples

  sitelerine gidiniz.

  Yayin : http://mesebilisim.com

  Licensed under the Apache License, Version 2.0 (the "License").
  You may not use this file except in compliance with the License.
  A copy of the License is located at

  http://www.apache.org/licenses/
"""

import pprint
import requests

# demo account API_KEY
# https://iothook.com/en/device/data/100/
# 100 - Demo Data HTTP
API_KEY = '9e722c4fc6c834b15ba01e86'  # write api key
url = 'http://iothook.com/api/update/?api_key=' + API_KEY

data = url + '&field_1=10&field_2=20&field_3=30'

response = requests.get(data)
pprint.pprint(response.json())
Send Data in GET with Python Examples 2:
You can find this example and others at IoT Examples Get Write 1 Github.
"""
  Python ile IoThook REST Api Ornegi

  IoThook'da her cihazin bir kimlik numarasi APIKEY'i vardir.
  Bu APIKEY kullanilarak veriler IoThook'a GET metodu ile gonderilir.
  10 kere 15 saniyede bir random verileri iothook'a gonderir.


  Bu ornek IoThook servisine veri almak/gondermek icin baslangic seviyesinde
  testlerin yapilmasini amaclamaktadir.

  v1 : 20 Eylul 2017
  v2 : 19 Agustos 2019
  v3 : 31 Ekim 2022

  Sahin MERSIN - electrocoder

  Daha fazlasi icin

  http://www.iothook.com
  https://www.mesebilisim.com
  https://mesemekatronik.com
  https://electrocoder.blogspot.com
  https://github.com/meseiot/iotexamples

  sitelerine gidiniz.

  Yayin : http://mesebilisim.com

  Licensed under the Apache License, Version 2.0 (the "License").
  You may not use this file except in compliance with the License.
  A copy of the License is located at

  http://www.apache.org/licenses/
"""

import pprint
import requests
import time

# demo account API_KEY
# https://iothook.com/en/device/data/100/
# 100 - Demo Data HTTP
API_KEY = '9e722c4fc6c834b15ba01e86'  # write api key
url = 'http://iothook.com/api/update/?api_key=' + API_KEY

for i in range(10):
    data = url + '&field_1=10&field_2=20&field_3=30'

    response = requests.get(data)
    pprint.pprint(response.json())
    time.sleep(15)
Arduino and ESP8266
Arduino and ESP8266 HTTP Post Examples.
Arduino and ESP8266 HTTP POST Send Data
In this example, Arduino code is given for sending data to iothook with ESP8266 connected to Arduino Uno with RX and TX. In the example, random numbers between 0-100 were generated and the device was sent to the device with “#100 - Demo Data HTTP” on iothook.
You can find this example and others at IoT Examples ESP8266 Post Github.
/*
      Arduino ile ESP8266 Wifi Modul Testi

      Kod Arduino ya yuklendiginde Arduino IDE nin Serial Monitor u
      ile ESP8266 arasinda haberlesme gozlenebilir.

      Arduino ile ESP8266 arasindaki iletisim Baud ayari
      115200 olmalidir.

      Arduino 0 ile 100 arasinda uretmis oldugu Random sayıyı iothook a gonderir.

      Bu cihaza ait datalar
      https://iothook.com/en/device/data/19/
      adresinden gercek zamanli olarak izlenebilir.

      Bu ornek IOThook servisine veri gondermek icin baslangic ayarlarinin
      yapilmasini amaclamaktadir.

      24 Eylul 2017
      Güncelleme : 19 Agustos 2019
      Sahin MERSIN

      Daha fazlasi icin

      http://www.iothook.com
      ve
      https://github.com/electrocoder/IOThook

      sitelerine gidiniz.
      Sorular ve destek talepleri icin
      https://github.com/electrocoder/IOThook/issues
      sayfasina gidiniz.

      Yayin ve sahiplik http://mesebilisim.com
    */

    #include "SoftwareSerial.h"

    String ssid = "WIFI_ID";
    String password = "WIFI_PASSWORD";

    SoftwareSerial esp(10, 11);// RX, TX

    String data;

    String server = "iothook.com";

    String uri = "/api/update/";

    void setup() {

      esp.begin(115200);

      Serial.begin(115200);

      Serial.println("Arduino ile ESP8266 Wifi Modul Testi");
      Serial.println("          www.IOThook.com           ");
      Serial.println("");

      reset();

      connectWifi();

    }


    void reset() {

      esp.println("AT+RST");

      delay(2000);

      if (esp.find("OK") ) Serial.println("Modul Reset yapildi");
      else Serial.println("Module Reset yapılamadi");

    }


    void connectWifi() {

      String cmd = "AT+CWJAP=\"" + ssid + "\",\"" + password + "\"";

      esp.println(cmd);

      delay(4000);

      if (esp.find("OK")) {

        Serial.println("ESP8266 Wifi ye baglandi");

      }

      else {

        connectWifi();

        Serial.println("ESP8266 Wifi ye baglanamadı!");
      }

    }


    void loop () {

      // ID : 100 Demo Data HTTP

      data = "{\"api_key\":\"9e722c4fc6c834b15ba01e86\",\"field_1\":" + String(random(0, 100)) + "}";

      httppost();

      delay(5000);

    }


    void httppost () {

      esp.println("AT+CIPSTART=\"TCP\",\"" + server + "\",80");

      if ( esp.find("OK")) {

        Serial.println("TCP baglanti hazir");

      }
      else
        Serial.println("TCP baglanti hatali");

      delay(3000);

      String postRequest =

        "POST " + uri + " HTTP/1.0\r\n" +

        "Host: " + server + "\r\n" +

        "Accept: *" + "/" + "*\r\n" +

        "Content-Length: " + data.length() + "\r\n" +

        "Content-Type: application/x-www-form-urlencoded\r\n" +

        "\r\n" + data;

      String sendCmd = "AT+CIPSEND=";

      esp.print(sendCmd);

      esp.println(postRequest.length() );

      delay(1500);

      if (esp.find(">")) {
        Serial.println("Gonderiliyor...");
        esp.print(postRequest);

        if ( esp.find("SEND OK")) {
          Serial.println("Gonderildi :)");

          while (esp.available()) {

            String tmpResp = esp.readString();

            Serial.println(tmpResp);

          }

          esp.println("AT+CIPCLOSE");

        }
        else
          Serial.println("Gonderilemedi :(");

      }
      else
        Serial.println("Gonderim hatasi! ESP hazir degil!");
    }
Arduino and ESP8266 HTTP POST Send Data 2
In this example, Arduino code is given for sending data to iothook with ESP8266 connected to Arduino Uno with RX and TX. In the example, random numbers between 0-100 were generated and the device was sent to the device with “#100 - Demo Data HTTP” on iothook.
You can find this example and others at IoT Examples ESP8266 Post Send Github.
/*
      Arduino ile ESP8266 Wifi Modul Testi

      Kod Arduino ya yuklendiginde Arduino IDE nin Serial Monitor u
      ile ESP8266 arasinda haberlesme gozlenebilir.

      Arduino ile ESP8266 arasindaki iletisim Baud ayari
      115200 olmalidir.

      Arduino 0 ile 100 arasinda uretmis oldugu Random sayıyı iothook a gonderir.

      Bu cihaza ait datalar
      https://iothook.com/en/device/data/19/
      adresinden gercek zamanli olarak izlenebilir.

      Bu ornek IOThook servisine veri gondermek icin baslangic ayarlarinin
      yapilmasini amaclamaktadir.

      24 Eylul 2017
      Güncelleme : 19 Agustos 2019
      Sahin MERSIN

      Daha fazlasi icin

      http://www.iothook.com
      ve
      https://github.com/electrocoder/IOThook

      sitelerine gidiniz.
      Sorular ve destek talepleri icin
      https://github.com/electrocoder/IOThook/issues
      sayfasina gidiniz.

      Yayin ve sahiplik http://mesebilisim.com
    */

    #include "SoftwareSerial.h"

    String ssid = "WIFI_ID";
    String password = "WIFI_PASSWORD";

    SoftwareSerial esp(10, 11);// RX, TX

    String data;

    String server = "iothook.com";

    String uri = "/api/update/";

    void setup() {

      esp.begin(115200);

      Serial.begin(115200);

      Serial.println("Arduino ile ESP8266 Wifi Modul Testi");
      Serial.println("          www.IOThook.com           ");
      Serial.println("");

      reset();

      connectWifi();

    }


    void reset() {

      esp.println("AT+RST");

      delay(2000);

      if (esp.find("OK") ) Serial.println("Modul Reset yapildi");
      else Serial.println("Module Reset yapılamadi");

    }


    void connectWifi() {

      String cmd = "AT+CWJAP=\"" + ssid + "\",\"" + password + "\"";

      esp.println(cmd);

      delay(4000);

      if (esp.find("OK")) {

        Serial.println("ESP8266 Wifi ye baglandi");

      }

      else {

        connectWifi();

        Serial.println("ESP8266 Wifi ye baglanamadı!");
      }

    }


    void loop () {

      // ID : 100 Demo Data HTTP
      // https://iothook.com/en/device/settings/100/
      // https://iothook.com/en/device/data/100/
      data = "{\"api_key\":\"9e722c4fc6c834b15ba01e86\",\"field_1\":" + String(random(0, 100)) + "}";

      httppost();

      delay(5000);

    }


    void httppost () {

      esp.println("AT+CIPSTART=\"TCP\",\"" + server + "\",80");

      if ( esp.find("OK")) {

        Serial.println("TCP baglanti hazir");

      }
      else
        Serial.println("TCP baglanti hatali");

      delay(3000);

      String postRequest =

        "POST " + uri + " HTTP/1.0\r\n" +

        "Host: " + server + "\r\n" +

        "Accept: *" + "/" + "*\r\n" +

        "Content-Length: " + data.length() + "\r\n" +

        "Content-Type: application/x-www-form-urlencoded\r\n" +

        "\r\n" + data;

      String sendCmd = "AT+CIPSEND=";

      esp.print(sendCmd);

      esp.println(postRequest.length() );

      delay(1500);

      if (esp.find(">")) {
        Serial.println("Gonderiliyor...");
        esp.print(postRequest);

        if ( esp.find("SEND OK")) {
          Serial.println("Gonderildi :)");

          while (esp.available()) {

            String tmpResp = esp.readString();

            Serial.println(tmpResp);

          }

          esp.println("AT+CIPCLOSE");

        }
        else
          Serial.println("Gonderilemedi :(");

      }
      else
        Serial.println("Gonderim hatasi! ESP hazir degil!");
    }
Arduino, ESP8266, Nodemcu Send Data in GET
With the IOThook Api v1.4 update, it allows sending data with the GET method.
You can find this example and others at IOTHOOK Git
Here is an example of sending data using the Get method with Arduino, ESP8266, NodeMCU:
    // 18.09.2017
    // Guncelleme : 19.08.2019
    // nodemcu ile sicaklik ve nem takibi
    // electrocoder@gmail.com
    // sahin mersin
    // v1

    #include <ESP8266WiFi.h>          //https://github.com/esp8266/Arduino

    //needed for library
    #include <DNSServer.h>
    #include <ESP8266WebServer.h>
    #include <WiFiManager.h>          //https://github.com/tzapu/WiFiManager

    //for LED status
    #include <Ticker.h>

    #include <ESP8266HTTPClient.h>

    #include "DHT.h"

    #define DHTPIN 4     // what digital pin we're connected to   // D2 - GPIO4
    #define DHTTYPE DHT11

    DHT dht(DHTPIN, DHTTYPE);

    Ticker ticker;

    void tick()
    {
      //toggle state
      int state = digitalRead(BUILTIN_LED);  // get the current state of GPIO1 pin
      digitalWrite(BUILTIN_LED, !state);     // set pin to the opposite state
    }

    //gets called when WiFiManager enters configuration mode
    void configModeCallback (WiFiManager *myWiFiManager) {
      Serial.println("Entered config mode");
      Serial.println(WiFi.softAPIP());
      //if you used auto generated SSID, print it
      Serial.println(myWiFiManager->getConfigPortalSSID());
      //entered config mode, make led toggle faster
      ticker.attach(0.2, tick);
    }


    void setup() {
      // put your setup code here, to run once:
      Serial.begin(115200);

      //set led pin as output
      pinMode(BUILTIN_LED, OUTPUT);

      // start ticker with 0.5 because we start in AP mode and try to connect
      ticker.attach(0.6, tick);

      //WiFiManager
      //Local intialization. Once its business is done, there is no need to keep it around
      WiFiManager wifiManager;
      //reset settings - for testing
      //wifiManager.resetSettings();

      //set callback that gets called when connecting to previous WiFi fails, and enters Access Point mode
      wifiManager.setAPCallback(configModeCallback);

      //fetches ssid and pass and tries to connect
      //if it does not connect it starts an access point with the specified name
      //here  "AutoConnectAP"
      //and goes into a blocking loop awaiting configuration
      if (!wifiManager.autoConnect("MeseIoT", "MeseIoT**")) {
        Serial.println("failed to connect and hit timeout");
        //reset and try again, or maybe put it to deep sleep
        ESP.reset();
        delay(1000);
      }

      //if you get here you have connected to the WiFi
      Serial.println("connected...yeey :)");
      ticker.detach();
      //keep LED on
      digitalWrite(BUILTIN_LED, LOW);

      dht.begin();
    }


    void loop() {
      // Wait a few seconds between measurements.
      delay(2000);

      // Reading temperature or humidity takes about 250 milliseconds!
      // Sensor readings may also be up to 2 seconds 'old' (its a very slow sensor)
      float h = dht.readHumidity();
      // Read temperature as Celsius (the default)
      float t = dht.readTemperature();
      // Read temperature as Fahrenheit (isFahrenheit = true)
      float f = dht.readTemperature(true);

      // Check if any reads failed and exit early (to try again).
      if (isnan(h) || isnan(t) || isnan(f)) {
        Serial.println("Failed to read from DHT sensor!");
        return;
      }

      // Compute heat index in Fahrenheit (the default)
      float hif = dht.computeHeatIndex(f, h);
      // Compute heat index in Celsius (isFahreheit = false)
      float hic = dht.computeHeatIndex(t, h, false);

      Serial.print("Humidity: ");
      Serial.print(h);
      Serial.print(" %\t");
      Serial.print("Temperature: ");
      Serial.print(t);
      Serial.print(" *C ");
      Serial.print(f);
      Serial.print(" *F\t");
      Serial.print("Heat index: ");
      Serial.print(hic);
      Serial.print(" *C ");
      Serial.print(hif);
      Serial.println(" *F");

      ///
      HTTPClient http;

      // configure server and url
      http.begin("http://iothook.com/api/update/?api_key=9e722c4fc6c834b15ba01e86&field_1=" + String(t) + "&field_2=" + String(h) + "");
      //http.begin("192.168.1.12", 80, "/test.html");

      Serial.print("[HTTP] GET...\n");
      // start connection and send HTTP header
      int httpCode = http.GET();
      if (httpCode > 0) {
        // HTTP header has been send and Server response header has been handled
        Serial.printf("[HTTP] GET... code: %d\n", httpCode);

        // file found at server
        if (httpCode == HTTP_CODE_OK) {

          // get lenght of document (is -1 when Server sends no Content-Length header)
          int len = http.getSize();

          // create buffer for read
          uint8_t buff[128] = { 0 };

          // get tcp stream
          WiFiClient * stream = http.getStreamPtr();

          // read all data from server
          while (http.connected() && (len > 0 || len == -1)) {
            // get available data size
            size_t size = stream->available();

            if (size) {
              // read up to 128 byte
              int c = stream->readBytes(buff, ((size > sizeof(buff)) ? sizeof(buff) : size));

              // write it to Serial
              Serial.write(buff, c);

              if (len > 0) {
                len -= c;
              }
            }
            delay(1);
          }

          Serial.println();
          Serial.print("[HTTP] connection closed or file end.\n");

        }
      } else {
        Serial.printf("[HTTP] GET... failed, error: %s\n", http.errorToString(httpCode).c_str());
      }

      http.end();
      ////
      delay(13000);
    }
ESP8266EX Wemos Send Data in GET
ESP8266EX Wemos D1 mini v3 HTTP Send Method.
You can find this example and others at IOTHOOK Git
Here is an example of sending data using the Get method with NodeMCU:
/**
   esp8266ex_send_http_data.ino

   sahin mersin

   https://github.com/electrocoder/IOThook/tree/master/examples

   iothook.com
   mesebilisim.com

   https://github.com/esp8266/Arduino Created on: 24.05.2015
*/

#include <Arduino.h>

#include <ESP8266WiFi.h>
#include <ESP8266WiFiMulti.h>

#include <ESP8266HTTPClient.h>

#include <WiFiClient.h>

ESP8266WiFiMulti WiFiMulti;

const int led = 2;

void setup() {

  Serial.begin(115200);
  // Serial.setDebugOutput(true);

  Serial.println();
  Serial.println();
  Serial.println();

  for (uint8_t t = 4; t > 0; t--) {
    Serial.printf("[SETUP] WAIT %d...\n", t);
    Serial.flush();
    delay(1000);
  }

  pinMode(led, OUTPUT);

  WiFi.mode(WIFI_STA);
  WiFiMulti.addAP("SSID", "PASS");
}

void loop() {
  // wait for WiFi connection
  if ((WiFiMulti.run() == WL_CONNECTED)) {

  digitalWrite(led, 1);

    WiFiClient client;

    HTTPClient http;

    Serial.print("[HTTP] begin...\n");

    float t = 12.34; // example value
    float h = 45.67; // example value

    // https://iothook.com/en/device/data/100/
    // # 100 - Demo Data HTTP-100

    String address = "http://iothook.com/api/update/?api_key=9e722c4fc6c834b15ba01e86&field_1=" + String(t) + "&field_2=" + String(h);
    Serial.println(address);

    if (http.begin(client, address)) {  // HTTP


      Serial.print("[HTTP] GET...\n");
      // start connection and send HTTP header
      int httpCode = http.GET();

      // httpCode will be negative on error
      if (httpCode > 0) {
        // HTTP header has been send and Server response header has been handled
        Serial.printf("[HTTP] GET... code: %d\n", httpCode);

        // file found at server
        if (httpCode == HTTP_CODE_OK || httpCode == HTTP_CODE_MOVED_PERMANENTLY) {
          String payload = http.getString();
          Serial.println(payload);
        }
      } else {
        Serial.printf("[HTTP] GET... failed, error: %s\n", http.errorToString(httpCode).c_str());
      }

      http.end();
    } else {
      Serial.println("[HTTP] Unable to connect");
    }
  }

  digitalWrite(led, 0);

  delay(10000);
}
NodeMCU Send Data in GET
With the IOThook Api v1.4 update, it allows sending data with the GET method.
You can find this example and others at IOTHOOK Git
Here is an example of sending data using the Get method with NodeMCU:
// 04.05.2023
// NodeMCU Send Data GET Method
// NodeMCU ESP8266
// electrocoder@gmail.com
// sahin mersin
// v1
// mesebilisim.com

#include <ESP8266WiFi.h>          //https://github.com/esp8266/Arduino

#include <DNSServer.h>
#include <ESP8266WebServer.h>
#include <WiFiManager.h>          //https://github.com/tzapu/WiFiManager

#include <Ticker.h>

#include <ESP8266HTTPClient.h>

Ticker ticker;

void tick()
{
  int state = digitalRead(BUILTIN_LED);  // get the current state of GPIO1 pin
  digitalWrite(BUILTIN_LED, !state);     // set pin to the opposite state
}


void configModeCallback (WiFiManager *myWiFiManager) {
  Serial.println("Entered config mode");
  Serial.println(WiFi.softAPIP());
  //if you used auto generated SSID, print it
  Serial.println(myWiFiManager->getConfigPortalSSID());
  //entered config mode, make led toggle faster
  ticker.attach(0.2, tick);
}


void setup() {
  Serial.begin(115200);

  pinMode(BUILTIN_LED, OUTPUT);

  ticker.attach(0.6, tick);

  WiFiManager wifiManager;
  //reset settings - for testing
  //wifiManager.resetSettings();

  wifiManager.setAPCallback(configModeCallback);

  if (!wifiManager.autoConnect("MeseIoT", "Mese")) {
    Serial.println("failed to connect and hit timeout");
    ESP.reset();
    delay(1000);
  }

  Serial.println("connected...yeey :)");
  ticker.detach();
  //keep LED on
  digitalWrite(BUILTIN_LED, LOW);

}


void loop() {
  delay(2000);

  HTTPClient http;

  String server = "http://iothook.com/api/update/?api_key=";
  String api_key = "9e722c4fc6c834b15ba01e86"; // #100 - Demo Data HTTP https://iothook.com/en/device/settings/100/

  Sting datas = "&field_1=1";

  http.begin(server+api_key+datas);

  Serial.print("[HTTP] GET...\n");

  int httpCode = http.GET();
  if (httpCode > 0) {

    Serial.printf("[HTTP] GET... code: %d\n", httpCode);

    if (httpCode == HTTP_CODE_OK) {

      int len = http.getSize();

      uint8_t buff[128] = { 0 };

      WiFiClient * stream = http.getStreamPtr();

      while (http.connected() && (len > 0 || len == -1)) {

        size_t size = stream->available();

        if (size) {
          int c = stream->readBytes(buff, ((size > sizeof(buff)) ? sizeof(buff) : size));

          Serial.write(buff, c);

          if (len > 0) {
            len -= c;
          }
        }
        delay(1);
      }

      Serial.println();
      Serial.print("[HTTP] connection closed or file end.\n");

    }
  } else {
    Serial.printf("[HTTP] GET... failed, error: %s\n", http.errorToString(httpCode).c_str());
  }

  http.end();

  delay(13000);
}
GO Send Data in GET
With the IOThook Api v1.4 update, it allows sending data with the GET method.
You can find this example and others at IOTHOOK Git
Here is an example of sending data using the Get method with Go Language:
Go Language Send Data with GET Method
// 04.05.2023
// GO language send data with GET method

package main

import (
	"io/ioutil"
	"log"
	"net/http"
)

func main() {
	resp, err := http.Get("http://iothook.com/api/update?api_key=9e722c4fc6c834b15ba01e86&field_1=10&field_2=2&field_3=3")
	if err != nil {
		log.Fatalln(err)
	}
	//We Read the response body on the line below.
	body, err := ioutil.ReadAll(resp.Body)
	if err != nil {
		log.Fatalln(err)
	}
	//Convert the body to type string
	sb := string(body)
	log.Printf(sb)
}
Go Language Send Data with GET Method 2
// 04 Eylul 2017
// Guncelleme: 19 Agustos 2019
// Sahin MERSIN
// iothook.com
// postman kullanilarak olusturulmustur

package main

    import (
        "fmt"
        "net/http"
        "io/ioutil"
    )

    func main() {

        url := "http://iothook.com/api/update?api_key=9e722c4fc6c834b15ba01e86&field_1=10&field_2=2&field_3=3"

        req, _ := http.NewRequest("GET", url, nil)

        req.Header.Add("cache-control", "no-cache")

        res, _ := http.DefaultClient.Do(req)

        defer res.Body.Close()
        body, _ := ioutil.ReadAll(res.Body)

        fmt.Println(res)
        fmt.Println(string(body))

    }
PHP Send Data in GET
With the IOThook Api v1.4 update, it allows sending data with the GET method.
You can find this example and others at IOTHOOK Git
Here is an example of sending data using the Get method with PHP Lang.:
// 04 Eylul 2017
// Guncelleme: 19 Agustos 2019
// Sahin MERSIN
// iothook.com
// postman kullanilarak olusturulmustur

    <?php

    $request = new HttpRequest();
    $request->setUrl('http://iothook.com/api/update');
    $request->setMethod(HTTP_METH_GET);

	// https://iothook.com/en/device/data/100/
	// #100 - Demo Data HTTP

    $request->setQueryData(array(
      'api_key' => '9e722c4fc6c834b15ba01e86',
      'field_1' => '10',
      'field_2' => '2',
      'field_3' => '3'
    ));

    $request->setHeaders(array(
      'postman-token' => '791ba738-7cb8-a920-0e5c-883cfb3e4498',
      'cache-control' => 'no-cache'
    ));

    try {
      $response = $request->send();

      echo $response->getBody();
    } catch (HttpException $ex) {
      echo $ex;
    }
NodeJS Send Data in GET
With the IOThook Api v1.4 update, it allows sending data with the GET method.
You can find this example and others at IOTHOOK Git
Here is an example of sending data using the Get method with NodeJS:
// 04 Eylul 2017
// Guncelleme: 19 Agustos 2019
// Sahin MERSIN
// iothook.com
// postman kullanilarak olusturulmustur

var http = require("http");

var options = {
  "method": "GET",
  "hostname": "iothook.com",
  "port": null,
  "path": "/api/update?api_key=9e722c4fc6c834b15ba01e86&field_1=10&field_2=2&field_3=3",
  "headers": {
    "cache-control": "no-cache",
    "postman-token": "033da3c8-6196-cd49-f72d-1850a7d18500"
  }
};

var req = http.request(options, function (res) {
  var chunks = [];

  res.on("data", function (chunk) {
    chunks.push(chunk);
  });

  res.on("end", function () {
    var body = Buffer.concat(chunks);
    console.log(body.toString());
  });
});

req.end();
Javascript Jquery Ajax Send Data in GET
With the IOThook Api v1.4 update, it allows sending data with the GET method.
You can find this example and others at IOTHOOK Git
Here is an example of sending data using the Get method with Javascript Jquery Ajax:
    // 04 Eylul 2017
    // Guncelleme: 19 Agustos 2019
    // Sahin MERSIN
    // iothook.com
    // postman kullanilarak olusturulmustur

    var settings = {
      "async": true,
      "crossDomain": true,
      "url": "http://iothook.com/api/update?api_key=9e722c4fc6c834b15ba01e86&field_1=10&field_2=2&field_3=3",
      "method": "GET",
      "headers": {
        "cache-control": "no-cache",
      }
    }

    $.ajax(settings).done(function (response) {
      console.log(response);
    });
Java Unirest Send Data in GET
With the IOThook Api v1.4 update, it allows sending data with the GET method.
You can find this example and others at IOTHOOK Git
Here is an example of sending data using the Get method with Java:
// 04 Eylul 2017
// Guncelleme: 19 Agustos 2019
// Sahin MERSIN
// iothook.com
// postman kullanilarak olusturulmustur

HttpResponse<String> response = Unirest.get("http://iothook.com/api/update?api_key=9e722c4fc6c834b15ba01e86&field_1=10&field_2=2&field_3=3")
  .header("cache-control", "no-cache")
  .asString();
Java Request Send Data in GET 2
With the IOThook Api v1.4 update, it allows sending data with the GET method.
You can find this example and others at IOTHOOK Git
Here is an example of sending data using the Get method with Java:
// 04 Eylul 2017
// Guncelleme: 19 Agustos 2019
// Sahin MERSIN
// iothook.com
// postman kullanilarak olusturulmustur

OkHttpClient client = new OkHttpClient();

Request request = new Request.Builder()
  .url("http://iothook.com/api/update?api_key=9e722c4fc6c834b15ba01e86&field_1=10&field_2=2&field_3=3")
  .get()
  .addHeader("cache-control", "no-cache")
  .build();

Response response = client.newCall(request).execute();
Arduino ESP32 ESP-C3-13 Request Send Data in GET
Data will be sent to IoThook with HTTP GET method with ESP32 on Arduino IDE.
The device used in this project is the ESP-C3-13 produced by ai-thinker. The features of the device and the settings for programming with Arduino IDE are as follows.
Device: ESP-C3-13
FCC ID: 2ATPO-ESP-C3-X C3-2M
Device Doc.: https://docs.ai-thinker.com/_media/esp32/docs/esp-c3-12f_specification.pdf
Arduino IDE Board Select: ESP32C3 Dev Module
Arduino IDE CPU Frequency: 160MHZ
Arduino IDE Flash Size: 2MB
Arduino IDE Partition Schema: 2MB
Arduino IDE MacOS Upload Speed: MacOS: 115200, Windows and Linux: 460800
You can find this example and others at IOTHOOK Git
Here is an example of sending data using the Get method with C:
/*
  Date: 02.09.2023
  Device: ESP-C3-13
  FCC ID: 2ATPO-ESP-C3-X C3-2M
  Device Doc.: https://docs.ai-thinker.com/_media/esp32/docs/esp-c3-12f_specification.pdf
  Arduino IDE Board Select: ESP32C3 Dev Module
  Arduino IDE CPU Frequency: 160MHZ
  Arduino IDE Flash Size: 2MB
  Arduino IDE Partition Schema: 2MB
  Arduino IDE MacOS Upload Speed: MacOS: 115200, Windows and Linux: 460800

  BasicHTTPClient.ino
  Created on: 24.05.2015

  MacOS Boud Rate Error:
    18:15:51.714 -> ESP-ROM:esp32c3-api1-20210207
    18:15:51.714 -> Build:Feb  7 2021
    18:15:51.714 -> rst:0x1 (POWERON),boot:0xc (SPI_FAST_FLASH_BOOT)
    18:15:51.714 -> SPIWP:0xee
    18:15:51.714 -> mode:QIO, clock div:1
    18:15:51.714 -> load:0x3fcd5810,len:0x438
    18:15:51.714 -> ets_loader.c 78
 */

#include <WiFi.h>

const char* ssid = "ssid";       // Change this to your WiFi SSID
const char* password = "password";  // Change this to your WiFi password

const char* host = "iothook.com";  // This should not be changed
const int httpPort = 80;           // This should not be changed

void setup() {

  Serial.begin(115200);
  while (!Serial) { delay(100); }

  Serial.println();
  Serial.println("******************************************************");
  Serial.print("Connecting to ");
  Serial.println(ssid);

  WiFi.begin(ssid, password);

  while (WiFi.status() != WL_CONNECTED) {
    delay(500);
    Serial.print(".");
  }

  Serial.println("");
  Serial.println("WiFi connected");
  Serial.println("IP address: ");
  Serial.println(WiFi.localIP());

} // setup


void loop() {

  WiFiClient client;

  if (!client.connect(host, httpPort)) {
    return;
  }

  float field_1 = random(100);

  String footer = String(" HTTP/1.1\r\n") + "Host: " + String(host) + "\r\n" + "Connection: close\r\n\r\n";

  // HTTP Device Data List
  // # 100 - Demo Data HTTP-100
  // https://iothook.com/en/device/data/100/
  // Device Read API Key	b5d91b83c85276cddc84eb67
  // Read Device Data	https://iothook.com/api/device/?api_key=b5d91b83c85276cddc84eb67&results=2
  // Device Write API Key	9e722c4fc6c834b15ba01e86
  // Write Device Data	https://iothook.com/api/update/?api_key=9e722c4fc6c834b15ba01e86&field_1=10

  client.print("GET /api/update/?api_key=9e722c4fc6c834b15ba01e86&field_1=" + String(field_1) + footer);

  Serial.println(String(field_1) + " send ok");

  int maxloops = 0;
  //wait for the server's reply to become available
  while (!client.available() && maxloops < 1000)
  {
    maxloops++;
    delay(1); //delay 1 msec
  }
  if (client.available() > 0)
  {
    //read back one line from the server
    String line = client.readStringUntil('\r');
    Serial.println(line);
  }
  else
  {
    Serial.println("client.available() timed out ");
  }

  delay(5000);

} // loop
MQTT Send Data Publish
Hello; In this help file, we will try to do everything you need to know about the MQTT messaging protocol and any IO operations you need. These examples should be customized to your device and MQTT Broker. For this reason, you should thoroughly learn why you want to use it and how it is applied. In a nutshell, MQTT uses your Internet home network and Mobile GSM 3G, 4G, 4.5G and 5G networks to send and respond to messages to your IoT devices.
You can make your MQTT experiments on the IoThook MQTT MQTT Broker page here.
Arduino ESP32 ESP-C3-13 Send JSON Data Publish MQTT
In this example, JSON data is sent to the device channel named “#100 - Demo Data HTTP” using the HTTP POST method with Python. When the data is sent successfully, Json REST output of the data is received. You can do this with the response.json() method, we are doing.
You can find this example and others at IOTHOOK Git
Here is an example of sending data using the Get method with C:
/*
  Test MQTT Publish
  16.09.2023

  * Device: ESP-C3-13
  * FCC ID: 2ATPO-ESP-C3-X C3-2M
  * Device Doc.: https://docs.ai-thinker.com/_media/esp32/docs/esp-c3-12f_specification.pdf
  * Arduino IDE Board Select: ESP32C3 Dev Module
  * Arduino IDE CPU Frequency: 160MHZ
  * Arduino IDE Flash Size: 2MB
  * Arduino IDE Partition Schema: 2MB
  * Arduino IDE MacOS Upload Speed: MacOS: 115200, Windows and Linux: 460800

  REQUIRES the following Arduino libraries:
  DHT Sensor Library: https://github.com/adafruit/DHT-sensor-library
  Adafruit Unified Sensor Lib: https://github.com/adafruit/Adafruit_Sensor
  HX711 https://github.com/bogde/HX711
  Mqtt : https://github.com/256dpi/arduino-mqtt?ysclid=leihxfhhq6294250283
*/


#include <WiFi.h>
#include <MQTT.h>
#include "HX711.h"

#include <DHT.h>
#include <DHT_U.h>

#define DHTPIN 23
#define DHTTYPE DHT21

DHT_Unified dht(DHTPIN, DHTTYPE);

const char ssid[] = "SSID";
const char pass[] = "PASS";

WiFiClient net;
MQTTClient client;

const char BROKER[] = "iothook.com";
const char BROKERUSERNAME[] = "iothookpublic";
const char BROKERPASSWORD[] = "iothookpublic";

// ID 101 : https://iothook.com/en/device/pub-sub-mqtt/101/
const char PUBTOPIC[] = "iot/879ba3d9ab3df048f8b3299f/esp32test/r";
const char SUBTOPIC[] = "iot/879ba3d9ab3df048f8b3299f/esp32test/w/UID005";

const char UID[] = "UID005";


const int LED_RED = 3;

const int ldr = A0;

unsigned long lastMillis = 0;

#define DEBUG 1


void messageReceived(String &topic, String &payload) {

  if (DEBUG) Serial.println("messageReceived: " + topic + " - " + payload);

  String messageTemp;

  for (int i = 0; i < payload.length(); i++) {
    // Serial.print((char)payload[i]);
    messageTemp += (char)payload[i];
  }

  if (messageTemp == "led:on") {
    Serial.println(" led on ");
    digitalWrite(LED_RED, HIGH);
  } else if (messageTemp == "led:off") {
    Serial.println(" led off ");
    digitalWrite(LED_RED, LOW);
  }

}  // messageReceived


void setup() {

  Serial.begin(115200);

  pinMode(LED_RED, OUTPUT);

  WiFi.begin(ssid, pass);

  client.begin(BROKER, net);

  client.onMessage(messageReceived);

  connect();

  delay(100);

}  // setup


void connect() {

  Serial.print("checking wifi...");
  while (WiFi.status() != WL_CONNECTED) {
    if (DEBUG) Serial.print(".");
    delay(1000);
  }

  Serial.print("\nconnecting...");
  while (!client.connect(UID, BROKERUSERNAME, BROKERPASSWORD)) {
    if (DEBUG) Serial.print(".");
    delay(1000);
  }

  Serial.println("\nconnected!");

  client.subscribe(SUBTOPIC);

}  // connect


void loop() {

  client.loop();
  delay(10);

  if (!client.connected()) {
    delay(5000);
    connect();
  }

  if (millis() - lastMillis > 1000) {
    lastMillis = millis();
    send_data();
  }

  delay(100);

}  // loop


void send_data() {

  float field_1 = random(0, 2000);

  int isik = analogRead(ldr);

  String veriler = "{'weight':" + String(field_1) + ",'temperature':" + String(field_1) + ",'humidity':" + String(field_1) + ",'image':1,'ldr':" + String(isik) + ",'device_id':" + UID + "}";
  if (DEBUG) Serial.println("send_data " + veriler);

  client.publish(PUBTOPIC, veriler);

}  // send_data